Blueberry Dump Cake: the No-mix Dessert Everyone Loves
Layer blueberries, dry cake mix, and butter in a pan—no stirring required—then bake until bubbling and golden for effortless cobbler-like dessert perfection.
Dump cake lives up to its name with remarkable honesty. You literally dump ingredients into a baking dish without mixing, stirring, or combining them in any way. The magic happens during baking as butter seeps down through dry cake mix, creating pockets of crispy topping while blueberries beneath bubble into jammy filling. The result resembles cobbler or crisp but requires a fraction of the effort. This dessert succeeds spectacularly while breaking every traditional baking rule about proper mixing and technique.
Blueberry dump cake shines as a summer dessert when fresh berries overflow at farmers markets, but frozen blueberries work equally well year-round. The generous amount of fruit creates a thick, bubbling filling loaded with berry flavor. As blueberries cook, they release their natural juices which mingle with a bit of sugar to form a sauce that is neither too runny nor too thick. The pectin in blueberries naturally thickens the filling without any cornstarch or flour additions.
The genius lies in the textural contrast. The bottom stays soft and fruit-forward like traditional cobbler filling, while the top transforms into golden, crispy clusters reminiscent of streusel topping. Melted butter performs the transformation, activating the leavening in the cake mix and creating those irresistible crunchy bits. Each spoonful delivers both textures, making every bite interesting from first to last.
This recipe works perfectly for entertaining because you assemble it hours ahead and slide it into the oven when needed. The hands-off nature means you can focus on other dishes or spend time with guests rather than babysitting dessert. Serve it warm with vanilla ice cream melting into the blueberry filling for a combination that never fails to impress.
What Makes This Recipe So Good
Zero mixing eliminates the most common baking errors. There is no risk of overmixing, no concern about proper creaming technique, no worrying whether ingredients are adequately combined. You arrange layers and walk away. This foolproof method welcomes absolute beginners, people intimidated by traditional baking, and anyone who wants delicious results without technical skills.
The minimal cleanup appeals to anyone who hates washing dishes. One baking dish, one knife for slicing butter—that is the entire cleanup. No mixing bowls, no electric beaters, no measuring cups for multiple dry ingredients. You bake and serve from the same dish, further reducing mess. More time enjoying dessert, less time scrubbing pans.
Blueberries provide nutritional benefits that make this dessert slightly more virtuous than most. Loaded with antioxidants, vitamin C, and fiber, blueberries offer genuine health benefits alongside indulgence. While still a sweet treat, the generous fruit-to-topping ratio means you get significant nutrition with your dessert. Using fresh or frozen berries without added sugar keeps it relatively wholesome.
The forgiving timing means this dessert accommodates your schedule rather than demanding precision. Five minutes over or under the recommended baking time will not ruin it. The visual cues—bubbling edges, golden top—tell you when it is done regardless of your specific oven quirks. This flexibility helps when juggling multiple dishes for a large meal or working with an oven that runs hot or cold.
Ingredients
For classic blueberry dump cake, gather these components:
- Fresh or frozen blueberries – 6 cups (about 2 pounds or 900 grams) for generous fruit layer
- Granulated sugar – one-half cup (100 grams) to sweeten the berries
- Lemon juice – 2 tablespoons, freshly squeezed to brighten berry flavor
- Yellow or white cake mix – one 15.25-ounce box, any brand works
- Unsalted butter – 1 cup (2 sticks or 226 grams), melted but not hot
Do not thaw frozen blueberries before using. Frozen berries actually work better because they release juice more gradually during baking, preventing the topping from becoming soggy. Fresh blueberries work beautifully too, especially at peak season when they are sweet and bursting with juice.
For enhanced flavor and texture, consider these optional additions:
- Ground cinnamon – 1 teaspoon mixed with the sugar for warm spice notes
- Vanilla extract – 1 teaspoon drizzled over the berries adds depth
- Lemon zest – from 1 lemon, mixed with berries for bright citrus flavor
- Sliced almonds – one-half cup sprinkled over cake mix for nutty crunch
- Cornstarch – 2 tablespoons tossed with very juicy berries for thicker filling
For serving, these accompaniments enhance the experience:
- Vanilla ice cream – the classic pairing that creates hot-cold contrast
- Whipped cream – fresh or from a can, both work
- Heavy cream – pour over individual servings for richness
- Greek yogurt – tangy contrast to sweet filling, works for breakfast too
Step-by-Step Instructions
Prepare the pan: Preheat your oven to 350°F (175°C) and position the rack in the center. Spray a 9-by-13-inch baking dish with cooking spray. Glass, ceramic, or metal pans all work fine, though metal conducts heat more efficiently and browns edges better. Do not use a smaller pan as the generous filling amount needs this size for proper depth and even cooking.
Layer the blueberries: Spread all 6 cups of blueberries evenly across the bottom of the prepared pan. Try to create a uniform layer so the topping bakes evenly. Frozen berries can go straight from freezer to pan—do not thaw them. Sprinkle the sugar over the berries, distributing it as evenly as possible. Drizzle the lemon juice over everything. Do not stir or mix—just let the sugar and lemon sit on top of the berries.
Add the cake mix: Open the box of cake mix and sprinkle the dry powder evenly over the sugared blueberries. Use your hands or a spoon to spread it into an even layer, but absolutely do not mix it into the fruit below. Complete coverage is important—every bit of cake mix should have butter on it eventually, so spread it edge to edge. Breaking up any large lumps in the mix helps create even topping, but maintain distinct layers.
Drizzle the butter: Pour the melted butter evenly over the entire surface of the dry cake mix. Start in one corner and work your way across in a zigzag pattern to ensure coverage. Try to drizzle butter over every area—unbuttered spots of cake mix will stay powdery and raw. You want to see butter pooling slightly in places. This generous amount of butter is what creates the crispy, golden topping everyone loves.
Optional toppings: If using sliced almonds or a cinnamon-sugar mixture, sprinkle them over the buttered cake mix now. They will toast beautifully during baking, adding extra flavor and texture. This step is purely optional but adds a bakery-quality finishing touch.
Bake: Place the dish in the preheated oven and bake for 45 to 55 minutes. Watch for two visual cues that indicate doneness: the blueberry filling should bubble vigorously around the edges and sometimes through the topping, and the cake mix should turn a deep golden brown. If the top browns too quickly before the filling bubbles, tent loosely with aluminum foil for the last 10 to 15 minutes. This allows the filling to finish cooking without burning the topping.
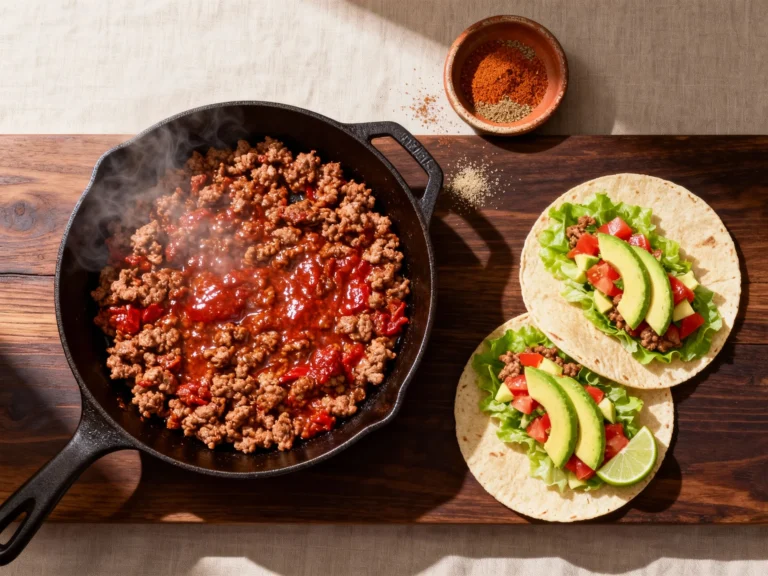
Cool and serve: Remove from the oven and let rest for 10 to 15 minutes. This brief cooling allows the filling to thicken slightly, making it easier to serve neat portions. Serve warm for the best experience—the contrast between hot dessert and cold ice cream is magical. Scoop generous portions into bowls and top with vanilla ice cream or whipped cream.
Storage Tips
Blueberry dump cake can sit at room temperature for up to 4 hours after baking, making it suitable for potlucks or gatherings where refrigeration is not immediately available. The fruit filling is perishable, so do not leave it out overnight. Cover loosely with foil rather than plastic wrap, which can make the topping soggy from trapped steam.
For longer storage, refrigerate covered dump cake for up to 4 days. The cold temperature firms up the filling and makes the topping lose some crispness, but the flavor remains excellent. Reheat individual portions in the microwave for 45 to 60 seconds to warm the filling and slightly restore topping texture. For crisper topping, reheat portions in a 350°F oven for 10 minutes.
Freezing works well for make-ahead convenience. Cool the dump cake completely, cover tightly with plastic wrap and then aluminum foil for double protection. Freeze for up to 3 months. Thaw overnight in the refrigerator, still covered to prevent condensation from making it soggy. Reheat in a 350°F oven for 15 to 20 minutes until warmed through and the top crisps up again.
Individual portions freeze beautifully if you want grab-and-go servings. Cut the cooled dump cake into squares, wrap each piece individually in plastic wrap, then store in a freezer-safe container or bag. Microwave frozen portions for 90 seconds to 2 minutes for a quick dessert. The individual wrapping prevents freezer burn and makes it easy to thaw exactly the number of servings you need.
Benefits
No oven monitoring required once you slide it in to bake. Unlike cakes that might sink if you open the door too early or cookies that need rotating halfway through, dump cake bakes unattended. Set a timer and walk away. This hands-off nature frees you to focus on other meal components or spend time with family and guests rather than babysitting the oven.
Budget-friendly ingredients make this dessert accessible and economical. Frozen blueberries cost significantly less per pound than fresh, especially off-season. A box of cake mix runs about two dollars. Butter is the priciest component, but you likely have it already. Total cost per serving is minimal, making dump cake perfect for feeding crowds without breaking the budget.
Year-round availability means you can make this any time. Frozen blueberries ensure consistent quality regardless of season. In summer, use fresh berries when they are abundant and cheap. In winter, pull frozen berries from your freezer. The recipe works equally well with either, removing seasonality restrictions.
Versatile timing for assembly and baking provides flexibility. Assemble the dump cake hours ahead and refrigerate until ready to bake. Pull it from the fridge, let it sit while the oven preheats, then bake. This advance prep reduces last-minute stress when hosting. Alternatively, bake it ahead and reheat when serving time arrives.
Kid-friendly preparation makes this an excellent family project. Children can safely layer ingredients without sharp knives or hot stoves until baking time. The dramatic transformation from separate layers to cohesive dessert fascinates kids and teaches them about how heat changes food. Success comes easily, building confidence and interest in cooking.
Impressive presentation despite minimal effort means you look like a talented baker without the work. Served warm with ice cream melting into the bubbling filling, dump cake appears far more complicated than it actually is. Guests never need to know how easy it was—let them assume you worked hard.
Common Mistakes to Avoid
Mixing the layers defeats the entire purpose and creates a different dessert. Keep ingredients in distinct layers—berries on bottom, cake mix in the middle, butter on top. This separation is what creates the textural contrast everyone loves. Stirring creates a uniform, pudding-like consistency rather than the intended cobbler-style result with distinct fruit filling and crispy topping.
Skimping on butter produces dry, powdery patches on top. Use the full cup of melted butter and drizzle it thoroughly over every bit of cake mix. Unbuttered areas will not cook properly, staying raw and chalky. The generous butter amount transforms dry powder into golden, crispy topping. Do not reduce it trying to make a lighter dessert—the butter is essential to success.
Using too small a pan causes overflow as the filling bubbles. The 9-by-13 size is important for the right depth and fruit-to-topping ratio. Cramming everything into a smaller pan results in too-thick layers that cook unevenly, and the filling may bubble over the edges onto your oven floor. Deeper pans also take significantly longer to bake through.
Overbaking until dry ruins the texture. Watch for vigorous bubbling and golden-brown top, then remove from the oven. Continuing to bake until every spot is deeply brown dries out the filling and makes the topping hard rather than crispy. Some lighter patches on top are acceptable and still taste good. Better slightly underdone than overdone.
Serving immediately while molten hot makes portions impossible to scoop neatly. The filling is literally bubbling like lava straight from the oven. Let it rest for 10 to 15 minutes so the juices thicken slightly. This cooling period makes serving cleaner and prevents burnt mouths. If you want it very hot, reheat portions briefly rather than serving straight from the oven.
Using salted butter in combination with cake mix that already contains salt creates overly salty flavor. Cake mixes are pre-salted, so adding salted butter doubles the sodium. Always use unsalted butter for this recipe. If you only have salted butter available, it will still work but may taste slightly too salty for some palates.
Variations
Lemon Blueberry Dump Cake: Use lemon cake mix instead of yellow or vanilla, and add the zest of 2 lemons mixed with the blueberries. The bright citrus amplifies blueberry flavor beautifully and cuts the sweetness. Drizzle cooled cake with a simple lemon glaze made from powdered sugar and lemon juice for extra zing.
Blueberry Crisp Dump Cake: Before adding butter, sprinkle 1 cup old-fashioned oats mixed with one-quarter cup brown sugar and 1 teaspoon cinnamon over the cake mix. Then drizzle with butter. The oats toast during baking, creating nutty flavor and extra crispy texture that mimics traditional fruit crisp.
Mixed Berry Dump Cake: Replace 3 cups of blueberries with a combination of strawberries, raspberries, and blackberries. The variety of berries creates more complex flavor and beautiful color. Increase sugar to three-quarters cup to balance the tartness from raspberries and blackberries.
Blueberry Almond Dump Cake: Use white cake mix and add one-half teaspoon almond extract drizzled over the berries. Sprinkle one-half cup sliced almonds over the butter before baking. The almond flavor pairs elegantly with blueberries, creating a more sophisticated dessert perfect for dinner parties.
Spiced Blueberry Dump Cake: Mix 1 teaspoon cinnamon, one-half teaspoon nutmeg, and one-quarter teaspoon cardamom with the sugar before sprinkling over berries. These warm spices transform the simple dump cake into something special for fall and winter. Top with a scoop of cinnamon ice cream instead of vanilla.
Bourbon Blueberry Dump Cake: Add one-quarter cup bourbon or brandy drizzled over the sugared blueberries before adding cake mix. The alcohol cooks off during baking, leaving sophisticated depth of flavor without any alcoholic taste. This adult version impresses at dinner parties.
FAQ
Can I use fresh blueberries instead of frozen? Absolutely, fresh berries work perfectly. They may release juice slightly less vigorously than frozen berries, so the filling might be a touch thicker and less saucy. Either way tastes excellent. If using fresh berries, toss them gently with the sugar and let sit for 10 minutes before adding cake mix—this helps draw out juices.
Do I need to thaw frozen blueberries? No, use them straight from the freezer. Frozen berries work better than thawed because they release moisture gradually during baking. Thawed berries dump all their liquid at once, potentially making the dessert too soupy and soggy. The slow juice release from frozen berries creates perfect consistency.
Can I use margarine instead of butter? Technically yes, but butter provides significantly better flavor. Margarine works in a pinch but the taste will not be as rich and delicious. For best results, stick with real unsalted butter. The flavor difference is noticeable in such a simple recipe where each ingredient shines.
Why is my dump cake soggy instead of crispy on top? Sogginess usually indicates too much liquid from the fruit or not enough butter. If using very juicy berries, toss them with 2 tablespoons cornstarch before layering. Also ensure you used the full cup of butter, drizzling it to cover all the cake mix. Insufficient butter coverage leaves damp spots.
Can I make this in a slow cooker? Yes, with modifications. Layer ingredients in a slow cooker as directed, but dot with small pieces of cold butter on top instead of drizzling melted butter. Cook on high for 2 to 3 hours until bubbling and golden. The top will not crisp as much as oven-baked but still tastes delicious.
How do I know when it is done? Look for vigorous bubbling around the edges and sometimes through the center of the topping. The cake mix layer should be mostly golden brown, though some lighter patches are fine. If you insert a knife through the topping, it should encounter hot, bubbling filling underneath rather than raw batter. These visual cues work regardless of your specific oven.
Final Thoughts
Blueberry dump cake proves that spectacular desserts do not require spectacular effort. This nearly foolproof recipe delivers consistent results while breaking every traditional baking rule about proper mixing and technique. The magic happens through simple layering and the transformative power of heat. Your only job is arranging ingredients and letting the oven do its work.
Do not overthink this recipe or try to improve it with extra steps. The beauty lies in its simplicity. Resist any urge to stir or mix layers together. Trust the process even though it seems too simple to work. The results—bubbling fruit beneath crispy, golden topping—speak for themselves every single time.
Keep cake mix and frozen blueberries stocked in your pantry and freezer for dessert emergencies. When unexpected guests arrive or you need a last-minute contribution to a potluck, you can have this in the oven in under 10 minutes of hands-on time. The impressive results and warm, welcoming aroma will have everyone assuming you spent hours baking. Let them believe it—your secret is safe.